00:00
00:00
DiMono
Deploy the... I think it's a yellow button... it's usually flashing... it makes the engines go... WHOOSH!

DiMono @DiMono

Age 43, Male

Website Developer

Toronto, Ontario

Joined on 9/8/04

Level:
32
Exp Points:
11,032 / 11,370
Exp Rank:
2,814
Vote Power:
7.35 votes
Rank:
Sup. Commander
Global Rank:
186
Blams:
4,168
Saves:
35,103
B/P Bonus:
60%
Whistle:
Deity
Trophies:
2
Medals:
5,343

DiMono's News

Posted by DiMono - October 1st, 2010


Solipskier is a game that's a little like Line Rider, in that you draw the terrain your character will travel on. Except your character is on skis, and can do wicked jumps and go 200kph.

Medals (7 for 110pts):
Nice Jump (5) - Get 100k points in a single high jump.

Bronze Medal In Awesomeness (10) - Achieve 1m points in a single run.

Where'd All My Tunes Go At?! (10) - Go fast enough to lose your headphones to the wind. Fast enough is 70kph.

Wicked Tricks (10) - Achieve a 50x multi.

Awesome Combo! (25) - Achieve 100x multi.

Gold Medal In Awesomeness (25) - Achieve 50m points in a single run. As of the time of this writing, it actually requires 100m points in a single run, verified by many in the Newgrounds Medal Games - Tips and Tricks thread.

Sick Air! (25) - Get 1m points in a single high jump. More on this later.

Gameplay:
The premise of this game is simple: draw the snow on which your skier will travel. When your skier is in the air and you're not drawing snow, he will do tricks. Hit gates to increase your speed and multiplier, hit them in midair to do so for a larger effect, and jump off the screen and over gates while off screen for a nice big bonus. All of the medals will come to you with enough playtime, which is undoubtedly why they're not worth that much.

In-Game Tips:
Running Poorly? Try disabling some of the graphics (gfx) options in the options menu to the left. Hopefully that will fix you up just fine.

Rainbow Bonus Keep your multiplier up by doing tricks in the air. While airborne, stop painting snow and you'll do tricks.

Buzz The Tower You get a big speed boost for passing through green gates while in mid-air. It also adds two extra on your multiplier.

Reach The Stars By jumping high in the sky you can earn extra points. The more gates you pass on your jump, the higher your score.

Perfect Tunnel Try your best to hit all the gates on a tunnel to rack huge bonus points. It helps to keep your eyes on the arrow.

Picking Up Speed Draw long downslopes with small upslopes and hit gates. Also, try to keep your cursor on the right side of the screen.

Mind The Gap You can't draw over jumps so make sure to time it right to clear the gap safely. The danger signs will hint when it's coming.

Suicide Hurts You Try your best not to kill yourself. If you run int oa vertical drift that you painted, or draw over the top of Solipskier, you'll die.

Avoid The Reds The "X" gates will kill Solipskier immediately, so beware. Use the long vertical line on the icon as a guide so you avoid it.

The Scoring Table High jumps can get you some serious points, but you have to travel high. Try to draw a steep slope to send Solipskier flying.

Where My Tunes? Sometimes Solipskier goes so fast he loses his headphones. Don't be alarmed, just listen to the wind and ride hard!

Gameplay Tips:
First of all, if you're skiing slowly you can draw a quick up and down, and you'll rapidly speed up to about 25-30kph. This can be helpful when you want to get your speed up, and is a quick way to start getting places at the beginning of your game.

There are two basic ways to play the game: jumps or skiing. Jumps involves getting a nice juicy multiplier, say about 80x, and then launching yourself into the air over and over until you lose it. As long as you don't miss a gate when you land, and you don't crash, you can keep building your multiplier this way as you jump over gates, and eventually you may get the 1m jump medal. Skiing takes more practice, and is the higher scoring gameplay method. Rather than jumping, you stay on the screen as much as possible, and focus on hitting gates and tunnels. You will always get more points for jumping through gates than jumping over them, without exception, so if you're going for a big score you'll definitely want to play by skiing. Like this person, who is not me:

.
/* */
Some things I've learned from my 100m attempts (current best 188m): Once you're going fast enough, don't worry about jumping through gates; skiing through them is enough, and can be done with more control. Don't jump if you can avoid it, and learn how to time small bounds at high speed in order to more dynamically claim gates that are far apart. When faced with red gates, jump past them rather than skiing past them, as being in the air seems to prolong your multiplier. And never underestimate the power of a perfect tunnel.

What's In This Game, Anyway?
Tunnels are important. Each one has 40 gates, and that tip up there is serious when it says you'll get huge bonus points for a perfect tunnel. The bonus for a perfect tunnel is dependant on both your multiplier and your speed, and I've gotten one as high as 19m. That's not even close to the highest I've seen someone else do, which is 97m, more than the 73m in the video you just passed at only a marginally better multiplier. You don't have to hit each gate on snow; just like regular gates you can be in the air when you go through them. However, when you get up to a very high speed it will quickly become impractical to try to keep up with the more windy tunnels, and you'll be better off picking and choosing when to follow the tunnel, and when to let it get away in order to avoid jumping over it; better to miss 20 gates than 35 and part of the next tunnel.

Speed is cool, but it takes a lot of practice to control Solipskier over 100kph. If you find you're having trouble controlling him, rather than toss him up in the air you should just draw your snow right at the top of the screen and miss 2 or 3 gates until you slow down to a manageable speed. This will keep you in control, and you'll lose your speed without the risk of coming down in the middle of a jump where you can't draw any snow to land on.

Jumps are an irritant, but they can be used to your advantage. With a bit of practice, you'll be able to use a jump to get your Solipskier into position for the next gate or tunnel without the risk of missing a gate along the way. One thing to look out for is consecutive jumps, because your landing area from the first one may be within the second one where you can't draw. It may be best to take a high jump in such cases and just hope for the best. However, once you get up to a sufficient speed you'll be able to just hold a horizontal path with your Solipskier, and he'll skip right past the jump for you. Just make sure that when you try this you're not in danger of losing your speed bonus, or you'll crash right into your snow and die.

Buzzing the tower doesn't require you to have any upward momentum, it just requires you to be in the air. A really simple trick for gaining speed and a multiplier quickly at the start of the game, or any time your speed and multiplier drop right down, is to ski up to the top of a gate and stop drawing your snow just before you get to it, and then draw some snow below the gate on the other side. Solipskier will pass through the gate, pick up speed, and that will be all you need in order to get yourself going. As you continue to play, with a bit of practice you'll be able to time drawing and not drawing such that you can jump through most of the gates safely without risking falling down or suicide. If you stay in the middle 50% of the screen you'll have a much easier time catching gates than if you go outside that area, especially when consecutive gates are on opposite sides of the screen.

When you're playing for score or for the massive jump, it's more important to get your multiplier up than it is to do a few mediocre jumps. As such, you should stay on the screen collecting gates for as long as possible, to get your speed and multiplier as high as you can without losing control. As you'll see in my screenshot below, it takes a really high speed and multiplier to get the 1 million point jump, so it's extremely relevant to build up your speed and multiplier before taking off. And don't worry if you miss a gate; odds are you'll get it back in literally a matter of seconds. If you get to a point where you know you won't be able to get the next gate and you don't want to lose your multiplier, launch yourself in the air and play catch; you'll keep gaining speed as you pass gates, and as long as you hit the first gate you see when you land you'll keep your speed and combo going. The risk to this is that if you come down in the middle of a jump, or you start drawing your snow too far forward, you're liable to kill yourself.

Each red or green gate you jump over when you're off the screen increases you score for the jump. As well, the longer you go without drawing snow, the higher your jump score will be. Jumping tunnels does not affect your jump score any more than jumping a series of jumps does; no green or red gates means no score boost. Jumping at about a 45 degree angle works best, and it will take practice to get the timing right.

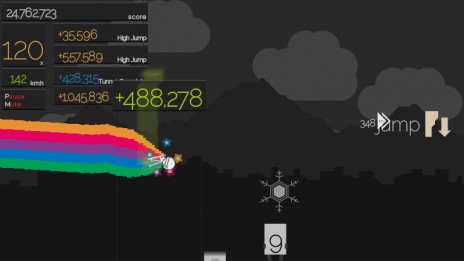
In order to get the 1 million point jump, you need to jump over about 10-12 gates without drawing snow, with an enormous multiplier. You also have to land the jump, or it won't count. I've made three 1 million point jumps, my highest being 1.3m, and I got a screenshot of my stats almost immediately after landing the first one. That screenshot is below. My speed and multiplier were both well over 100, though the multiplier is more important. The 488,278 label there is from the gate I buzzed after landing, and you'll notice another 428,315 from a non-perfect tunnel right before my jump; large multipliers are very good.

A note on being airborne: refraining from drawing snow does not affect your score when your Solipskier is in the visible part of the play area, but it does prolong your multiplier when you're going for a while without a gate to go through. There is no bonus for doing tricks where you can see them, and the number of points you get for buzzing a tower is unaffected by whether you're drawing snow. However, letting go of that mouse button is a surefire way to make sure your Solipskier is airborne. As such, once you're in the air there's no reason not to draw snow, provided you can see your Solipskier and you have gates visible in front of you. Also note that your snow will appear behind your mouse cursor, not under it. How far behind it varies with your speed. Keep this in mind when planning a landing from a jump

Unfairnesses:
About 10-15% of the time, a red gate that kills you will show up immediately after a tunnel, and if you're going too fast you won't have time to react. When this happens, it doesn't matter how well you're doing in the tunnel, you are almost always forced to either bail early into a jump or die. The positioning of the red gate should be taken into account here, though, as there's no need to jump a gate that you're going to miss anyway. About 3-5% of the time, a red gate will appear with significantly less warning than you're meant to have. Be on the lookout, and if you don't see anything indicated by the 2/3 point of the tunnel, be extremely wary and ready to jump.

For some reason, passing a red gate without dying doesn't do anything to prolong your multiplier. That means if you hit a tunnel at low speed immediately followed by a red gate, and you don't jump off the screen, you're going to lose your multiplier.

The jumps and gates are generated randomly, which means sometimes you'll get something that just can't be done at your current speed without a lot of practice. I've seen 12 red gates in a row at heights with enough variability that all I could do was hang out at the top of the screen and wait for them to pass, I've seen red gate and jump combinations that are impossible at low speed, and I've seen huge air jumps that go completely over two tunnels in a row. When you're facing a series of red gates and jumps, try to keep jumping off-screen. Passing the red gates off-screen will keep your multiplier and speed going, and keep you from having to restart at 1.

Sometimes your multiplier will vanish on you for no apparent reason while you're doing a huge air jump over jumps and tunnels. Again, there's nothing you can do about this.

In my ideal world, red gates would extend your multiplier and there would be a limit to how many times you can see them in a row. Unfortunately, it's not my game, so I don't get to make that call.

Number Observations:
70kph seems enough to skim past a jump

multipler and speed = perfect tunnel score (numbers are approximate):
15 and 50 = 170k
42 and 78 = 1.6m
57 and 91 = 4m
63 and 98 = 5m
72 and 106 = 7m
90 and 120 = 12.6m
95 and 126 = 15.7m
100 and 132 = 16.5m
120 and 150 = 24.5m
137 and 168 = 38m
165 and 190 = 67m
173 and 203 = 73m
180 and 210 = 82m
190 and 220 = 97m

Summary:
Basically, this is a game that just requires patience. You can get the 1m jump score by waiting until you have a high enough multiplier and speed, and you can literally get the 50m (100m) medal by just letting your guy chill out for a couple hours while you draw enough snow to keep him from crashing. That's boring and takes forever though, so I don't recommend it.

Solipskier Medal Guide


Posted by DiMono - September 23rd, 2010


Here's the game. It basically consists of a series of screens, each of which is a puzzle. You start on level 31 and go to level 50. Since the fun in these games is figuring out the solutions, even though they're all written below I recommend not looking at them unless you need to, so as to enjoy the puzzles in the game as much as possible.

Medals (15 for 470pts):
Fugitive (5) - pass level 32
Sooner or Later Will Turn Off (5) - pass level 33
Samuel Morse (25) - pass level 36
Medal to the Memory (10) - pass level 37
Passionate (5) - pass level 38
The Mystery of the Cube (50) - pass level 41
Polar Station (25) - pass level 42
Chinese Lessons (50) - pass level 43
Binary Code (25) - pass level 46
The Final Level! (100) - get to level 50
Secret Medal (5) - Not telling
Secret Medal (10) - Not telling
Secret Medal (50) - Not telling
Secret Medal (100) - Not telling

Level Solutions:
Copied from a review on the game left by SilhouetteSam

(THANKS TO SaviourtheHedgehog FOR THIS)

Level 31 (1º Part 1): "beginner" (it's the hardest one).

Level 32 (2º Part 1): "177349", "910780", "57029351"

Level 33 (3º Part 1): "anomaly"

Level 34 (4º Part 1): just click in the 4 where it says level 34. It will become a 5.

Level 35 (5º Part 1): "neptune"

Level 36 (6º Part 1): "nitro"

Level 37 (7º Part 1): "the dark side of the moon"

Level 38 (1º Bonus Level): "fringe"

Level 39 (2º Bonus Level): "louvre"

Level 40 (3º Bonus Level): "fire"

Level 41 (1º Hard Level): "0000ff","ffff00", "ff0000"

Level 42 (2º Hard Level): "elisabeth"

Level 43 (3º Hard Level): "love"

Level 44 (4º Hard Level): "tip"

Level 45 (5º Hard Level): click the end of the road.

Level 46 (6º Hard Level): "algae"

Level 47 (7º Hard Level): "bufflehead"

Level 48 (8º Hard Level): click on the end of the road that turns right. WARNING: DO NOT CLICK THE TUNNEL OR ELSE YOU WILL BE SENT BACK TO THE BEGINNING!

Level 49 (9º Hard Level): "god"

Level 50 (10º Hard Level): click the image repeatedly.


Posted by DiMono - September 22nd, 2010


The Beast: MDM is a series of quicktime challenges, in which you kill a bunch of people. You can do the regular murders with the spacebar when the word KILL shows up, or secondary murders with M (for Madness). Since everything is always the same, here's everything you need to know to get all the medals:

Medals (14 for 220pts):

Obtained by killing people with space bar:
Censored in Beast Trilogy (5) - Rip the first dude's head off.
Have A Nice Day (5) - Perform The Beast's signature smiley fatality.
Axe-cuse Me (5) - Beat the shit outa the A.T.P. agent with your axe.
Friends Stick Together (10) - Execute Sanford and Deimos with a shotgun.
Balls!! (10) - Crush Mag Agent, Torture.
Cruci-fuck You! (25) - Collect the heart of Jesus.
I... Hate... Clowns!! (50) - Explode Tricky's skull.

Obtained by killing people with M:
Where Is My Strawberry Tart? (5) - Shotgun rape the first guy.
He Didn't Have The Guts (5) - Remove the Sheriff's organs.
And It Was All Yellow (5) - Beat the shit outa your axe with the A.T.P. agent.
Boom! Shake-shake-shake The Room! (10) - Show Sanford and Deimos your grenade collection.
Cus He Had Nobody To Go With. LOLOL! (10) - Steal the mag agent's skeleton.
You Aint Got No Pancake Mix! (25) - Tear Jesus a new one.
Yoink (50) - Practice a bit of brain surgery on Tricky.

Key patterns to win:
r = right
l = left
u = up
d = down
kill = spacebar or M
Letters in sequence are part of the same command, and must be done in sequence quickly (i.e. lr = left then right, quickly)
Letters above each other are different commands

First Dude:
r
kill

Sheriff:
l
l
l
l
r
kill

The Weapon:
d
u
d
u
d
u
d
kill

The Comrades:
u
rd
l
rl
r
ll
kill

The Monstrosity:
d
urd
ll
r
r
u
l
kill

The Savior:
r
lr
dd
rr
du
u
rr
kill

The Clown:
l
(he transforms)
lr
rl
rlr
ldr
drul
urur
durd
dldlu
m


Posted by DiMono - September 17th, 2010


This is a walkthrough for the very fun game My First Quantum Translocator

Controls (found in-game):
Arrow keys to move, W to drop a quantum shadow, Space Bar to return to the location of the shadow. Returning to the shadow retains your momentum when hitting Space Bar, so if you're jumping and hit Space you'll be moving upward at the shadow's location. Since controls can be fickle, you can also press F to teleport to the shadow already jumping, but only if you're standing on solid ground.

You can be squished, and red blocks will kill you, and you can fall off the bottom of the screen. Dying will reset you to the beginning of the level. Along the way there are checkpoint rooms. If you have to leave the game and come back later, you can use the Continue Game option to begin from the last checkpoint you hit with that character; each character's progress is saved individually, so you don't get to finish the game with the spaceman, change to the girl, and use Continue Game to skip all the fun parts.

The game only takes about 6 minutes once you're good at it though, so it really isn't that arduous of a task when it comes right down to it.

Medals (6 for 130, in the order in which you are meant to get them):
The Final Frontier (25) - Beat the game and get the normal ending.
Promise Kept (25) - Beat the game and get the best ending. This is done by dropping a shadow on the screen immediately before going into space, and then when you're in space hitting the space bar to return to the previous screen.
The Jar Does Nothing! (10) - Get the best ending using the secret unlocked in 'Promise Kept'. Basically, play the game a second time and get the best ending.
Out Now For The PS3! (10) - Get the best ending using the secret unlocked in 'The Jar Does Nothing!' Basically, play the game a third time and get the best ending.
The End???? (10) - ?????? Play the game a fourth time and get the best ending.

Secret Medal (50) - It's a secret.

Now, the author to this game did something extremely silly in putting the codes for some medals in the medal pictures. Aside from ruining some of the fun of discovery, this also means you can get the medals in any order, because most of the codes are already out there for you. The picture for Promise Kept is the girl from the end screen, and the key combination to play as her. The picture for The Jar does Nothing! is the grasshopper in a jar, and the key combination to play as it. The picture for Out Now for the PS3! is the Castle Crashers dude and the key combination to play as him.

The picture for The End???? is a chicken with a question mark. That would seem to suggest that there's a way to play as the chicken, though I'm not going to reveal what it is; it's left as a mystery for a reason. I will, however, now provide a video walkthrough for how to beat the game using the chicken, since the fact that you are able to do so really shouldn't be a surprise, so a video using it shouldn't be spoiling anything since it's intuitive that it's possible to play as the chicken already.

.
/* */
Also, here is the walkthrough video originally posted by BlueTheReptar, which I used to get a couple room solutions; credit where credit is due, he figured it out before me.

.
/* */


Posted by DiMono - September 12th, 2010


This is a guide for Apples in the Tree. It might be the most stylistic medal game yet, with a great atmosphere and lots of things to do in such a small space. Because of how the medals relate to the game, I'm actually going to describe the game and its features first, and put the medals at the end. Trust me, it will make more sense this way.

Getting to the Tree
The point of the game is to keep getting to the apple tree so you can pick its apples. When you do so the first three times there's a skippable cutscene and dream sequence, and then you wake up in your bed. The last time is an unskippable cutscene, and the end of the game. You get to the tree in 4 ways, and they must be done in order.

1) Through the tunnel. Enter the house to the left, and there's a tunnel there. Enter the tunnel and walk to the left until you find the elevator, and take it up. Grab an apple.

2) Through the cave. Pass the house on the left and keep walking, and you'll enter a cave. The fourth log is on a geyser, so wait for it to land and jump on, and it will rise you up. When at the top, jump off to the right and continue along the path until you finally emerge at the tree. Grab an apple.

3) Over the cliff. Enter the house on the left and climb the ladder to get on the roof, then run off to the left (or jump if you're not confident) and climb the cliff. Proceed to the left along the cliff until you drop down at the tree. Grab an apple.

4) Catching a ride. You'll wake up and it will be raining. Go to the right and the cave there will be flooded with logs floating in it. Jump across the logs and you'll emerge in a new area. Depending how you've interacted with people so far, there are two possibilities: either you'll encounter a dude hanging from a tree and you can save him, or he won't be there and when you try to go to the right you'll drop into a pit, and he'll save you. Either way you end up at the tree again. Grab the last apple.

Miniquests
1) Kill the bugs. In the house to the right, a girl is hiding under her bed because she's afraid of the bugs downstairs. Take the elevator down and kill them. There's also a giant pumpkin on the screen to the right.

2) Save the kitty. When you walk to the right far enough, the screen changes to the opening of a cave. Jump over the opening and you'll find a girl whose kitty is stuck in the forest. Keep going to the right to find the kitty, then jump on branches to get back. If you get the kitty when it's raining, the cat will be dead and it will count as a bad deed.

3) Save the pumpkins. When you run, any small pumpkins underfoot will be crushed as you step on them. Instead, when you head to the left, walk through the pumpkin patch rather than running.

4) Get the guitar. When you go to the left past the pumpkin patch there's a house with someone sitting outside it. He won't give you back your key unless you give him your guitar. Your guitar is in the cupboard in your house. The kid will throw the key at you after you give him the guitar, and you can either let it go or beat him to a pulp.

5) Find the box. When you enter the house and climb the stairs, you'll encounter a girl who's lost something in the cave. The cave is the second route you take to get to the apple tree. When inside you'll have to jump some logs, and the last one shoots into the air on a stream of water to enable you to continue. Ride it up, and rather than jumping off to the right, jump off to the left. The box is on the ledge there.

6) Deliver the letter. Further on in the cave, you'll have three hollows you can go in, all of which have someone inside. Enter the third one and the person there will give you a letter to deliver to someone. That someone is in the first hollow, so when you get the letter just backtrack your steps a little and deliver it.

7) Save the bird. When you go up on the roof of the house past the pumpkin patch, there's a second ledge below the one that's obvious. That ledge has a small bird in an egg. Grab it before proceeding across the upper ledge on your third trip to the apple tree. When making your way on that trip, there is a cave opening that doubles back below you to the right, in which is the bird's mother. Give her the egg.

Dreamland
There are four dreams in dreamland, each of which gives you a medal for completing them. There's also a medal for entering all 4 dreams in the same game. In order to get to dreamland, go into your house and up to the bed. Click on the bed to lie down in it, and then wait. After about 10 seconds you'll fall asleep, and wake up in dreamland.

1) Goodnight Demon Slayer. You get here by running off to the left. You have limited time to kill all the demons that pop up. You kill them by jumping or running on them. The easiest way to kill them all is to run all the way to the right, which will kill some incidentally, and then make your way to the left by running. When you're on your way to the left, whenever you get to a demon that doesn't die right away just run quickly back and forth over it and it will eventually get caught underfoot and die.

2) The Beast of Pirate's Bay. You get here by dropping into the water and then running to the left. Run left and up, then double back below that path to get the key. Proceed down and right until you get to the door, and use the key on it. Drop down and you'll see what looks like a harpooned whale. Pull out all the harpoons (you'll have to jump for the last one) and save the Beast.

3) Tornado of Souls. You get here by jumping and running off to the right. Hold down your space bar and make a break for it! It will take a few tries, but your goal is to make it to the hangar before the tornado reaches you. You may also collect Sharon Osbourne along the way.

4) Children of the Grave. Drop down the hole to the right. You can jump much higher here, and you'll see all the future tombstones of various personalities on Newgrounds. If you go to the right, you'll encounter the head of Jack Skellington, the Pumpkin King. If you go to the left, you'll encounter Ozzy Osbourne. If you've rescued Sharon already, he'll sign your ass. Spend as much time in the cemetery as you like, and when you're done jump off the edge of the world to wake up.

Medals: 12 for 330 points (will be 405 when the last two are approved)
Children of the Grave (5pts) - Reach the graveyard. As described above, enter the fourth dream.

Coward (5pts) - Just leave. When you get to the dude hanging from the tree, you can choose to run past him to the right, where you will find a boat. Click on the boat and you'll push off from shore to get the medal. If he's not hanging from the tree, you can't get this medal.

Dreamer (10pts) - Enter all 4 dreams in a single game.

Skull Beneath the Skin (10pts) - Wear the Vic Rattlehead mask. After getting your key back, go back to the cupboard in your house and you'll be able to open the locked box there. The mask is the one that's not a piggy bank.

Mrs Nice Girl (25pts) - You are such a sweet sweet thing. Do a bunch of the miniquests as you play the game.

When You're Evil (25pts) - Your tears are all the pay I'll ever need. Don't do any miniquests except getting your guitar. Take revenge on the kid for throwing the key, and crush all the pumpkins in the pumpkin patch.

Gray Fox (0pts - will be 25) - Neither Enemy nor Friend. Leave the pumpkin patch alone and don't do any quests. Basically, don't interact with anyone. This is how you get the ending where you fall in the pit trap and the dude saves you.

Goodnight Demon Slayer (50pts) - Slay 20 demon bastards. In the first dream, kill all the demons.

The Beast of Pirate's Bay (0pts - will be 50) - Help The Beast of Pirate's Bay. Finish the second dream.

Tornado of Souls (50pts) - Escape the Tornado of Souls. Finish the third dream. Collecting Sharon Osbourne is optional for this medal.

Smashin Pumpkins (50pts) - Just smash EVERY single pumpkin. This means the ones in the pumpkin patch, the one downstairs in the house to the right, and the head of Jack Skellington in the fourth dream.

Fan Number 1 (100pts) - Get an autograph from Ozzy. Rescue Sharon from the third dream, and deliver her to Ozzy in the fourth dream. Saving Sharon and getting out alive is hard, and takes almost perfect gameplay of the third dream, hence this medal's high point value.

Neat Things
If you click on the giant plant at the start of the game, it will lower a ledge for you to step on. If you ride it up you can jump on top of the plant, then jump off to the right to land on top of your house and talk to someone.

There's a random piggy bank in your closet. It doesn't do anything but look nice.

If you go to sleep with the mask on, it will still be on you when you're dreaming.

In the closet, there's a poster on the right that says Credits. Click it to read the credits and listen to an awesome song. Seriously, it's worth doing.


Posted by DiMono - September 12th, 2010


This is a guide to help you get the medals in the new game Recordshop Tycoon. Since you're basically guaranteed to get all the medals if you just play the game long enough, this guide is going to be different than most, in that I'm going to put more emphasis on general strategy than specific strategy.

Medals (5, 155pts)
It's There For A Reason (5pts) - Read through the entire manual. And really, you should anyway, because it explains in detail how the entire game works. If you do this right at the beginning, you'll get the medal after buying your first location.

Crowd Control (25pts) - Get more than 50 customers in one day.

Sleep Is For The Weak (25pts) - Play for 50 (in-game) days.

Major Player (50pts) - Buy all four properties. Order is not important. You may only buy one property a turn, and any news that's going on (a run on a genre, increased or decreased traffic, raised or reduced supplier prices, etc) will not carry over for the new store. You can theoretically win the game only selling discs at the first location, but it would take forever and be no fun.

No Nobility In Poverty (50pts) - Get a daily net result higher than $500. There is a bug in the game where when you get a result higher than $250 it says $500 by mistake, so don't freak out if you get the message but not the medal; that was supposed to be the message for $250. You'll get the medal the second time you see that message.

Building Your Store
The most important thing to do is upgrade the register. This should be your first task at all your locations, including the first one. You can upgrade it twice, for $250 and $500, and each time it speeds up transactions by 25%. The other things you can buy for your store are as follows:

CD Rack: Used for storing CDs. It costs $200 to store 10 CDs, and can be upgraded twice for $100 and $150 to add 5 each time. If you have the money handy, it's better to buy a new rack than upgrade two, and you don't need to upgrade any twice until you get to your last shop.

Demo Booth: A waste of $400. Save your money. In theory, anyone who listens to a song at the demo booth will buy an extra disc in their purchase, but after the second day nobody ever uses them. Cannot be upgraded, but that really doesn't matter.

DJ Booth: 80lbs of awesome in a 2lb bag. Costs $900, and everyone who enters your store gets an instant karma boost. Odds are you won't ever need one if you play the game well, but I usually put one in my last shop just because I can. If your karma is tanking, the DJ Booth will single-handedly save you in a single day. Cannot be upgraded, and occupies 4 spots on the floor.

Hi-Fi Set: Seems to increase the patience of your customers by about 50%. Costs $500, and is worth it, especially early on.

Neon Sign: Costs $750 and dramatically increases the number of people who enter your store. When you've got enough stock that you're never selling out, this is a worthwhile investment. It's not worth it for your starting shop though.

Karma
The higher your karma, the more you can sell discs for and the longer people will wait in line to pay for them. Conversely, the lower your karma, the less your selling value and the less their patience. Karma is important to your ability to succeed in this game. The following things affect karma:

Negative: long line at checkout. This is the largest karma dropper in the game. Solve it by upgrading your register and getting a hi-fi set.

Negative: high prices. Solve it by lowering your prices. I like to think this one's fairly obvious.

Negative: out of stock. They want urban, but there's no urban. Know your customers' musical taste, and cater to it.

Positive: DJ. They enter the shop, see the DJ, and your karma goes up. And lots of people enter the shop.

Positive: low prices. Depending on your karma, "low prices" could actually be above market value.

Positive: completing a sale. People like buying things.

Note: You lose significantly more karma from one person giving up on the line than you do from several people not finding the music they want. For this reason, it is important that you never have more people in your store than your checkout line can deal with, unless you have massively high karma and can bear it.

Locations
There are four locations for your stores which you'll use throughout the game. Each one is progressively larger, with a larger clientele. When you change location, your music and equipment do not go with you; you start from scratch each time, with only the money you have saved up. As such, you should make sure you have enough money saved to make a go of it at your new location. You should also sell your stock before moving, for the extra bit of cash. I like to plan my move, and try to limit my stock selection so I have a chance of selling out to my customers before moving, for maximum moving capital.

Below is a list of the four locations, showing which location they are, how much it costs, how much you should have saved up before buying it, and the musical preferences of your clientele. Any genre not listed for a location should generally be held in token amounts, where "token amounts" will vary based on the size of your customer base; from 2 or 3 at the beginning of the game to 15 or 20 at the end. It is also worth noting that these are just trends, and there will be days that completely defy this list.

Location 1: $100 / $450 - Urban, with a bit of pop and indie
Location 2: $750 / $2700 - Indie, then pop, then evenly distributed among the rest
Location 3: $1500 / $4150 - Lots of classics, then indie, then pop
Location 4: $2500 / $5850 - Pop, then urban and dance, then indie

Note that the more money you have when you buy a location, the less time you will spend there before being able to move on. Also note that with careful play you can move into location 4 before reaching day 50. It's also possible to move into location 2 before day 25, but it's much more difficult. The $450 for location 1 is your starting cash, and the $5850 for location 4 assumes that you're going to keep playing the game after buying it; if you're just after the medal then $2500 will do. In fact, if you're just after the medal you can save $4000, buy location 3, tank a turn, then buy location 4 and be done with it. But where's the fun in that?

Strategy
You want to increase your customer base as you expand the size of your musical selection, and after you've upgraded your register to handle the number of people coming in. It is vitally important for your karma that you avoid having your customers get fed up with long lines, so make sure you can handle the increased foot traffic before doing the promotion to get it.

To this end, in the first turn of the game you should upgrade your register, and stock your shelves with urban music. On the second turn, go for an 8-1-1 split between urban, pop and indie. Spend the next few turns restocking those same discs until you have enough money saved up to upgrade your music rack after refilling your stock, and then to buy a second rack. At this point your disc distribution should be something like 3-15-2-2-3, and you'll want to keep roughly those ratios for as long as you're at this location. Other locations have different ratios, which you'll learn as you go.

At this point your game becomes one of managing supply and demand with your ability to handle customers. If you're keeping the line at the register short enough that nobody's getting fed up with the wait and leaving, then you want to increase your shelf space and marketing. If people are starting to walk away, you need to stop that and either buy yourself a hi-fi set or upgrade your register again. I usually go for the hi-fi set before the second register upgrade, because I think its effect is greater, though I haven't been able to objectively measure it by the nature of the game.

In the general case, that's the entire game. However, certain in-game events will change how you play the game for the following day. If record prices are up, don't overstock your shelves, as the profit isn't there. If record prices are down, it's time to expand. If a genre has become popular, abandon your customers' usual preference and load up on that genre. And if an event happens that affects the size of your customer base, adjust your stock and expectations accordingly.

When buying the neon sign, make sure you have about 40% extra stock over what you usually sell in a day, because your foot traffic will go up that sharply. When placing CD racks, put them as far from the register as possible in order to delay your customers from getting there; it will help keep the line short. This becomes less relevant after you've upgraded the register twice, so don't get too hung up on it.

The last thing to discuss about gameplay is placement of CD racks. You can't block foot traffic within your store, but you can overlap it as long as the two racks are facing each other. This will let you put 4 racks in your first location, by having 3 across the top facing downward, and one in the middle of the bottom row facing upward; it cannot face right.

Cheating The System
The game only saves when you finish each day, and at no other time. It saves before the next day is announced. What that means is if you get a news item you don't like (or none at all), you can just refresh the window and continue your game, and you'll get a new one. So if you want to really progress quickly in-game, you can just keep refreshing until every day the suppliers are having a half off sale, and you'll make oodles of profit every day. Of course, it takes away the fun from the game, and makes it drag on and on as you spend more time refreshing the screen than actually playing the game, so whether you do this is up to you.

Known Bugs
Sometimes the register will just simply stop ringing people up, which will tank your karma if it happens early in the day. The only thing you can do about this is drop your prices and buy a DJ Booth, because the DJ's effect on your karma is legendary.

If you use Build Mode and don't turn it off before beginning your day, even if you go to the Office first, the Hi-Fi Set if present will appear in blueprint colours. Only a visual bug, but kind of entertaining I think.

Late in the game, it will sometimes stop working and bloat your memory usage. Unfortunately, all you can do about this is restart your browser and hope for the best.

Sometimes your customers will walk through the walls and head off in random directions, or check out nowhere near your register. This doesn't affect gameplay at all, but it's sure funny to watch.

The message for doing $250 in business is typoed to say $500, which is confusing because there's a medal in it for actually doing $500 in business. When playing the game, ignore the first $500 announcement and wait for the second.

.
/* */


Posted by DiMono - September 10th, 2010


Alice is Dead - Ep 3. The end of a trilogy, with an ending that some find disappointing but I rather like it.

Medals (4 for 95 points):
Brain (10) - The more thoughtful problem solver. Solve the two early problems using your brain
Brawn (10) - The more aggressive problem solver. Solve the two early problems with brawn
Out With A Ding (25) - Beat the Game.
Secret Medal (50)

Note: In order to get the Brain or Brawn medals you need to solve both puzzles in the same style; if you solve the first puzzle the brainy way and the second the brawny way, you won't get anything

Being Brainy
1) To get into your hideout, get the penny from the sewer. Use it to pry open the alarm box, and then click on the red wire to deactivate the alarm.

2) To get into the club, talk to Rulio on the screen to the left of the dumpster to find out about the mushroom, and then give him the penny. Put the mushroom in the bouncers' drink on the screen to the right of the dumpster, leave that screen, and then return to it.

Being Brawny
1) To get into your hideout, get the brick from the street and use it to smash the alarm box.

2) To get into the club, grab the steel pipe from the dumpster screen, and hit the bouncers with it on the screen to the right of the dumpster. Try to walk in and you'll see the metal detector, so toss the pipe in the dumpster and then come back.

Phone Numbers
In the game you have a cell phone. If you click on the Phone icon in the bottom right, you can dial and press Send (green phone receiver) to see what happens. This will usually result in you getting feedback that helps you in some way. But not always. Whenever the game says you have a message, click the icon to read it. The walkthrough will assume you're doing this.

Mary Ann: 555-7238
Hatter: 555-8880
Slot machine company: 555-4513
Bathroom Stranger: 555-6293
Long Boris: 555-7243
March Hare: 555-7321

Complete Everything Walkthrough
Click on the spade to go to town, and get into your hideout using one of the above methods. Click the journal to read it, and click on the answering machine to the right of the screen to listen to your messages. Call Ann and the Hatter. Leave your hideout and go to town, and get in the club using one of the above methods.

Go to the left into the kitchen and click on the thermostat, and raise the temperature to 90. Go right twice into the bathroom and you'll see a message on the mirror. Call the number. Also call the two numbers on the bathroom stall doors. Go back to the kitchen and click the bottom of the slot machine, and change the odds to 1 in 1. Return to the main kitchen screen and play the slot machine. Go back to the bathroom and enter the rightmost stall, and enter the secret lab. By now you should have received a response from Long Boris that says ALIVE SLICE. This is an anagram of ALICE LIVES.

Go to the right to the elevator screen and click on the elevator. Go left twice to the TV screen. Go back to the main bathroom screen. You are now looking for tapes. The first one is not always in the same spot, but it's always in or around the club. I've seen it on the bathroom sink, on the bathroom floor, back in the first secret lab screen, on a table in the lounge area, and outside on the bouncers' table. The second is in the dumpster, and Rulio has the third.

Once you have the tapes go back to the TV screen and put them each in the TV. Go to the elevator screen and you'll receive a text from Mary Ann saying she left a present for you. Return to the main bathroom screen and click on the cabinet under the sink to retrieve the package. Go back to the elevator and enter it. You just finished the game. Stay tuned after the credits.

Things You Don't Actually Need To Do
- You don't need to mess with the thermostat if you already have the number.
- You don't need to call anyone other than Mary Ann and the slot machine company.
- You don't need to touch the journal.
- If you do read the journal, you don't need to pay any attention to the briefcase combination, as there is no briefcase in this game. Its presence is most likely a nod to the first episode of the series.
- You don't need to listen to or watch anything all the way through.
- If you're going for the Brawn medal, you don't need to get the coin or talk to Rulio about the mushrooms.
- If you're going for the Brains medal, you don't need the brick or the pipe.

And finally, if you've made it this far and want to know more about the mythology of the game world, ImpendingRiot (the game's creator) has put up a Q&A about it over here. It's worth checking out if such things are of any importance to you. I know they fascinate me.


Posted by DiMono - September 8th, 2010


Pixel Purge

Awesome game with lots of medals

Medals (20 for 490 points):
Evasion Expert (Bronze)
- 5 points - Don't get hit for 30 seconds. You'll get this incidentally as you acquire other medals
High Score (Bronze) - 5 points - Acquire a score of 100,000 or greater. You'll get this incidentally as you acquire other medals
Slayer of the Peon King - 5 points - Defeat the largest Peon. You'll get this incidentally as you acquire other medals
Level Climber (Silver) - 10 points - Reach level 10. Basically, don't die for a while. You'll get this incidentally as you acquire other medals
Slayer of the Grunt King - 10 points - Defeat the largest Grunt. You'll get this incidentally as you acquire other medals
Slayer of the Miner King - 10 points - Defeat the largest Miner. An ironic medal, since there is only one size of miner. You'll get this incidentally as you acquire other medals
Slayer of the Splitter King - 10 points - Defeat the largest Splitter. You'll get this incidentally as you acquire other medals
Slayer of the Waver King - 10 points - Defeat the largest Waver. You'll get this incidentally as you acquire other medals
Hardcore (Platinum) - 25 points - Don't spend any skill points and reach level 10 or greater. One of the harder medals. You'll probably want to use my strategy below in order to get this
Marksman - 25 points - Accurately land 50 shots without a single miss. Yes, it's as annoying as you think it is. Easiest to get with your first 50 shots
Mine Sweeper - 25 points - Destroy 50 mines in a single game. Honestly, you'll get this one without even trying
Platinum Chain - 25 points - Reach a kill chain of 1000. You'll definitely want to use my strategy below to get this
Slayer of the Fume King - 25 points - Defeat the largest Fume. You'll get this incidentally as you acquire other medals
Slayer of the Seeker King - 25 points - Defeat the largest Seeker. You'll get this incidentally as you acquire other medals
Slayer of the Shield King - 25 points - Defeat the largest Shield. You'll get this incidentally as you acquire other medals
Slayer of the Vessel King - 25 points - Defeat the largest Vessel. You'll get this incidentally as you acquire other medals
Terminator (Gold) - 25 points - Defeat 1000 enemies in a single game. You'll get this incidentally as you acquire other medals
Bestiary Complete - 50 points - Completely fill your bestiary by defeating 20 of each enemy in the game. There seems to be a bug registering Vessel kills, but otherwise this is pretty straightforward
Master Trophy Collector - 50 points - Acquire all Trophies. The hardest one is reaching level 20
Defender of Pixela-RT - 100 points - 100% the game (Acquire a gold star on the main menu for boht Trophy and the Bestiary buttons). Pretty self explanatory

In-Game Trophies:
Staged trophies; Format is Name: Description for bronze/silver/gold/platinum
Chain: Reach a kill chain of 25/100/500/1000
Terminator: Defeat 250/500/1000/2500 enemies in a single game
High Score: Acquire a score of 100,000/250,000/500,000/1,000,000 or greater
Level Climber: Reach level 5/10/15/20
Evasion Expert: Don't get hit for 30/60/90/120 seconds
Hardcore: Don't spend any skill points and reach level 4/6/8/10 or greater

Gold accomplishment trophies
1 each for maxing each skill
1 each for killing the largest version of each enemy

Silver accomlishment trophies
Balanced Soldier: Obtain a level 3 or higher in every skill within a single game
Turret Master: Remain stationary and fight off enemies for 60 seconds
Marksman: Accurately land 50 shots without a single miss
Mine Sweeper: Destroy 50 mines in a single game

Platinum accomplishment trophies
1 each for acquiring all trophies of each level (all bronze = +2 skill points when starting a game, all silver = +3, all gold = +4, all platinum = +5)
1 for acquiring all trophies.

Game Mechanics:
The point of the game is to kill as many things as possible, while taking as little damage as possible. If you kill several enemies in a row without taking damage yourself, the size of your Chain increases.

Each enemy has a set number of points they're worth, and if you kill them as part of a chain, then the size of the chain before that kill gets added to the value of the kill. For instance, medium sized peons are worth 100, and if you kill one while having a Chain of 7, you'll get 107 points for the kill, and 108 for the next one, and so on. It doesn't take very long for this to start adding up.

Whenever you kill an enemy they drop pixels for you, and you can collect the pixels in order to level up. Leveling up increases the difficulty of the game, and harder enemies drop more pixels. As you level up you gain 2 Skill Points per level, which can be spent in-game to improve your ship in various ways. So the faster you level, the faster you can make your ship better, and the faster the game difficulty increases. You can increase each skill 5 times, and the cost to increase goes up by 1 each time.

Enemies can also drop power-ups in addition to dropping pixels. The exception to enemy drops is the Splitter, which drops nothing as an effect of its specific mechanics. Power-ups have no effect on score or pixel count, they only affect your ship in the described way.

Except for when you're chasing the Marksman trophy, you will want to hold down your mouse button for a constant rate of fire. You'll also want to make sure you know where your mouse cursor is at all times, or else you may go through a period of extreme vulnerability. When your immediate area is clear, fire off into the distance to try to catch enemies you can't see, as that will increase your Chain and your score.

Power-Ups:
Red circle with white cross = Restores some of your health. Seems to restore about 20%

Green circle with white arrow = Increases your rate of fire for a short duration. The faster your fire rate already is, the faster it becomes with this power-up

Blue circle with white pear = Grants you a shield which will absorb one hit. If you take a hit with the blue shield activated, your Chain will not be broken and the duration of your other power-ups will not be affected.

Orange circle with 3 dots = Increases your bullet spread and damage. Increases bullet spread by 1 and damage by 2. Since your base damage goes from 4 to 6, your quadruple damage goes from 16 to 24 as well

Note: Power-ups of different types will exist at the same time, while power-ups of the same type will refresh themselves but will not stack. Getting hit will remove your power-up duration.

Skills:
Critical Hit: Gives each bullet a chance to deal quadruple its normal damage. 4% per level

Piercing: Gives each bullet a chance to travel through an enemy and hit anything else in its path. 4% per level. Odds are you won't see a bullet pierce, but its effect will still be evident. The easiest way to tell is when you tear through an entire swarm of chasers in a single shot

Pixel Drop: Increases the number of pixels dropped by defeated enemies. 20% per level

Score Increase: Increases score earned by defeating enemies. 20% per level

Rapid Fire: Decreases the delay between shots. 11% per level

Fire Spread: Increases the number of bullets fired with each shot. +1 bullet per level

Regeneration: Increases the speed at which your health regenerates. -half a second per level

Magnet: Increases the range at which pixels will attract to you. +16m per level

Enemies:
Peon: Green. Moves orthogonally (straight up and down, straight left and right) without changing direction.

Grunt: Purple. Follows you.

Splitter: Blue square. Moves diagonally, and defeating it makes it split into 4 more of the next size down. Does not drop pixels.

Fume: Orange. Follows you, and its explosion is harmful to you. It will also self-destruct if it gets too close, and that explosion will do you damage.

Miner: Grey circle. Moves orthogonally, but drops mines behind it. The mines are powerful, and can quickly fill up an impressive area of the screen. These guys are seriously annoying, but they only spawn on levels 8 and 9

Waver: Yellow cross. Moves in a sine wave horizontally or vertically.

Vessel: Dull yellow circle. Follows you, and carries several of the smallest size of Grunts ("Chasers"), which are slowly released against you. If it gets too close, it will self-destruct and release a swarm of Chasers against you; the more healthy it is, the more Chasers there are. If it self-destructs in this way you will not get any credit for its destruction. If you destroy it, wealth in pixels shall be your reward instead, so that is how you can tell whether you shot it down.

Shield: Red. Circles you, and blocks your shots from hitting other enemies. When you hit them their radius expands, and then over time it closes in again.

Seeker: Blue squid-like. It will get close to you, and then charge through you. At the end of the charge, hit or miss, it charges again.

Strategy:
The game mechanics are important for planning out your strategy. Since the enemies don't get any harder until you increase your level, but they keep coming at their current level, it's to your advantage to draw the game out for as long as possible when hunting medals, especially early. Basically, you want to move around as little as possible, specifically avoiding gathering pixels unless you absolutely need to. The idea is to carve yourself a safe area, preferably in the middle of the map as the edges will reduce your reaction time from edge proximity, and then keep it clear. The exception to this is the Marksman trophy, for which you will likely have to move around a lot. It will become progressively harder to keep this strategy up in later levels, so you may need to intermittently abandon it, but you should always return to it whenever possible.

This play style has some important ramifications for your skill point distribution. Since you're avoiding gathering pixels, the Magnet and Pixel skills are useless to you. Since the play style inherently boosts your score by allowing you to get a very large Chain, the Score skill is unnecessary. So you're down from 8 skills to 5.

That means the only skills you need to worry about are regeneration (later), fire speed, fire spread, piercing and critical hit. And because you're playing for the easy, long Chain, you don't need to worry about chasing power-ups either; the only one you need is the blue shield power-up, and then you can safely ignore the rest for as long as you're hunting that Chain. Once you have your chain of 1,000, though, you'll definitely want those power-ups, as they make it much easier to progress in the game.

You'll have to play the game at least a few times in order to be successful at it, and a few more times to get the in-game trophies for maxing all your skills. Your playthroughs will be as follows:

1) Setup. Your goal here is to get as many Silver trophies at once as you can. Stay put for the first 60 seconds, shooting only at enemies that are coming straight at you, until you receive the Turret Master trophy. Use the strategy outlined above to get a Chain of 100, and do not spend any skill points until at least level 6. Keep the strategy up for as long as possible, and spread your skill points out so that you get all 8 skills to level 3 (assuming you make it that far). You want to end this first playthrough with a score of at least 250,000 and a level of at least 10. Ideally you'll also destroy 50 mines, and depending how the beginning of the game went you may have the Marksman trophy as well from only shooting at enemies coming directly at you.

2) Setup Mop-up. Pick out the silver trophies you don't have, and play individual games specifically to get them. You want to have all bronze and silver trophies before continuing.

3) Chasing the Chain. When you have all bronze trophies and all silver trophies, as you should now have, you get +5 skill points to start the game (2 from having all bronze, 3 from all silver; later 4 from all gold and 5 from all platinum). Distribute them between fire rate, fire spread and critical hit as you see fit. Use the strategy above, spending skill points as you get them, to get your Platinum Chain of 1,000 kills without injury. If you fail, quit and restart, as it's much harder to get a 1,000 chain with the harder enemies. When you succeed, keep the strategy up until you get a score of 1,000,000. At that point, this playthrough becomes the first in step 4.

4) Building your Resume. You get gold trophies for maxing each skill, and for killing the largest of each type of enemy. The enemy killing trophies will take care of themselves, but you'll need at least 4 games in which to max out all your skills one by one. Each game, pick 2 skills and focus on them. I recommend picking one skill from the list to focus on and one skill from the list to ignore, to give you a chance to get them both in the same game.

5) Chasing the Dream. Play for level 20 until you get it, and all remaining enemy medals. Your bestiary will fill itself as you go. You should be able to kill one of each of the largest enemies by level 19, so odds are you will actually get all the gold trophies first, which is nice for continuity.


Posted by DiMono - September 3rd, 2010


The Room

The game literally walks you through everything itself, so here's just how to get the medals:

Medals:
Nastwich (10) - Make a sandwich with drain cleaner, the rat, and the sponge
The Johnny (10) - Order a hot chocolate, medium, from the coffee shop
Best Friend (25) - win the fistfight with Mark (day 9, party)
Bookworm (25) - read Denny's journal every day. Easiest to do it first thing
Bugged (25) - First day, go to the electronics store and buy the tape recorder, and put it behind the phone in your living room. Listen to it on days 3, 4 and 9 after the party
Destroyer (25) - Smash everything in the living room and upstairs when raging (day 9, party)
Payback (25) - Go to the bank while raging and kill your boss (day 9)
Pusher (25) - Win the pushing contest with Mark (day 9, party)
Rainmaker (25) - Track down Chris R on the race course when raging and kill him (day 9)
Runner (25) - Win the footrace with Mark
The Room (25) - When raging, punch the crack to the right of Denny's room, and enter the hole (day 9)
Perfect Drug (50) - In each fight round with Chris R., taunt/glamor first and then throw something at him with perfect aim
Quarterback (50) - Perfect pass every time
Receiver (50) - Catch the ball every time
The Machine (50) - Collect all the spoons, and it will be activated at the end of the game (below)
Unsee (50) - See 6 things that should be unseen (below)

To activate the machine, you need spoons:
1 - sinister spoon - on the skeleton in the alley
2 - stone spoon - on the ground at the left-most screen
3 - shank spoon - in the jail cell
4 - chlorophyl spoon - in the bushes in the park
5 - kitchen spoon - in the kitchen, on the table
6 - flower spoon - in the window of the flower shop
7 - A.I. spoon - on the ghetto blaster in the electronics shop
8 - time spoon - on the Delorian
9 - wood spoon - on the left tree trunk at the entrance to the park
10 - fire spoon - in the fire in Mark's room

Things that cannot be unseen:
Day 1 - go to Mark's room
Day 1 - instead of going upstairs right away when it's nap time, go to the kitchen and come back
Day 3 - after taking Denny home, go back in his room
Day 6 - after playing tuxedo football, before washing, go into Mark's room
Day 7 - after leaving the coffee shop from meeting with Mark, go back in
Day 9 - after leaving the main room for work, immediately go back in


Posted by DiMono - August 9th, 2010


http://www.newgrounds.com/portal/view/
544332

Speedrun time: 2:22. It's probably possible in 2:20, but I'll leave that to another intrepid adventurer.

.
/* */